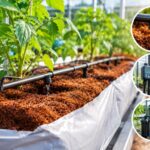
Propagation gets treated as the warm-up act. It is not. Whatever happens in those first three to five weeks sets the ceiling for everything that follows, and by the time a weak transplant reaches the production house there is very little you can do about it. That is why coco coir starter blocks deserve more attention than they usually get, and why growers who take propagation seriously tend to have suspiciously good season results.
The frustrating part is that the details that matter are small, cheap to control, and almost never discussed.
Why propagation media is a completely different problem
A production slab needs to buffer water, hold structure for a year or more, and feed a large root system. A propagation block needs to do almost the opposite: hold a precise, small amount of moisture around a tiny root system, drain fast enough to keep oxygen available, and stay physically intact when a worker picks it up with one hand and drops it into a hole.
Those are different engineering problems, and a grade that excels at one is often mediocre at the other. Anyone who has tried to propagate in leftover production-grade material knows how that goes.
1. Density matters more than size
Two blocks of identical dimensions can behave completely differently depending on how tightly the coir was compressed during moulding.
A loose block drains fast, dries fast, and falls apart when handled. A dense block holds moisture longer, resists crumbling, and can genuinely stall root development if it holds too much water for too long. There is a sweet spot, and it varies by crop and by how often your propagation house irrigates.
For tomato and cucumber propagation most growers want something moderately firm that holds shape through transplanting but still shows visible drainage within a minute of irrigation. Squeeze one. If water runs freely and the block springs back, you are in reasonable territory.
2. EC tolerance is much tighter than in production
This is the detail that catches people out.
A mature tomato plant in a production slab will shrug off a starting EC of 1.0 mS/cm. A seedling will not. Young roots have limited surface area and no reserves, so salt levels that a production crop barely registers can stall germination or burn emerging root tips.
For propagation, look for EC under roughly 0.5 mS/cm in a 1:1.5 extract, and insist on buffered material rather than merely washed. Unbuffered blocks release potassium into a nutrient solution designed around a very low feed rate, and the resulting calcium imbalance shows up as weak, stretched plugs that never quite catch up.
3. Arrival moisture and how you condition them
Blocks arrive dry and compressed, which is exactly what you want for freight, and then someone has to hydrate them properly.
Rushing this is the classic error. A block that looks expanded on the outside can still have a dry, compacted core, and a seed sitting on top of that never establishes evenly. Give blocks enough water and enough time, usually considerably more of both than instinct suggests, and check by breaking one open before you commit a whole batch.
Use water at ambient temperature rather than cold, and if your water is hard, be aware you are adding calcium and bicarbonate into a very low EC system. Some growers acidify their conditioning water slightly for this reason.
4. Getting coco coir starter blocks to fit the slab properly
Transplanting is mechanical, and mechanical problems are the easiest to prevent.
The hole in your production slab or bag needs to match the block dimensions closely. Too tight and you compress the block during transplant, damaging roots and restricting drainage. Too loose and you leave an air gap where the block and slab do not make contact, which means water moves past the plug instead of through it. That gap is responsible for a lot of mysteriously wilting transplants in week one.
Standard block sizes run roughly 7.5 by 7.5 centimetres and 10 by 10 centimetres for vegetable propagation, with taller variants where a longer root run is wanted. Confirm the match with your slab supplier before ordering either, because retrofitting is miserable.
5. Root escape, air pruning and timing your transplant
Roots reaching the outside of a block will do one of two things. On a solid bench in humid conditions they keep growing, tangle across neighbouring blocks, and tear when separated. On a mesh bench with airflow underneath they air prune, which produces a dense branched root system that establishes faster after transplant.
Mesh benching costs more up front and repays it in transplant quality. If you are already on solid benching, at minimum keep humidity in check and move plants on before roots start wandering.
Transplant timing is the other half. A block that has been held too long becomes root bound, and the plant carries that restriction into production. Most greenhouse vegetable growers move at roughly three to five weeks depending on crop and season. Watch the roots, not the calendar.
6. Hygiene in the propagation house
Coir arrives clean. Propagation houses do not stay clean by themselves.
Benches, trays, hands, hoses and standing water all move pathogens around, and a propagation house is the ideal environment for spreading something to every plant you own in a single week. Disinfect benches between batches, keep hose ends off the floor, and avoid standing water under benching.
It sounds obvious. It is also the thing most often skipped when a batch runs late and everyone is busy.
What about pellets, plugs and fibre pots?
Blocks are not the only option, and the right choice depends on what happens after propagation.
Seeding pellets, the small compressed discs wrapped in a fine net, suit high volume sowing of small seeded crops. They handle well in automated sowing lines and they are cheap per unit. The netting is the consideration: some growers find it restricts roots in longer cycles, and disposal adds a step if the net is not biodegradable.
Plug trays filled with fine pith give you the highest plant density per square metre of bench, which matters when propagation space is your bottleneck. They are less forgiving on irrigation because the volume is so small, so they suit operations with good overhead watering control.
Fibre pots sit at the other end, for crops going into larger containers or for nursery stock where the whole pot goes into the ground. Roots grow through the wall and the pot breaks down, which removes transplant shock almost entirely.
Most greenhouse vegetable operations end up with coco coir starter blocks for the main crops and pellets or plugs for anything sown in very high numbers. There is no prize for standardising on one format if two serve you better.
Water and feed during propagation
A quick word on this, because it is where block choice and crop management meet.
Propagation feed runs at a much lower strength than production feed, often around a quarter to a third. That low strength is exactly why substrate chemistry matters so much at this stage: anything the block contributes represents a large proportion of what the seedling actually experiences.
Watch bicarbonate in your water if you are on a borehole or hard municipal supply, since it pushes root zone pH up over a few weeks and young plants notice. Keep irrigation light and frequent rather than heavy, and let the block surface dry slightly between waterings to discourage algae, which competes for oxygen and makes a propagation house look neglected even when it is not.
A rough matching guide
| Crop | Typical block size | Weeks in propagation | Notes |
| Tomato | 10 x 10 cm | 4 to 6 | Grafted plants often need longer |
| Cucumber | 7.5 x 7.5 cm | 2 to 3 | Fast, watch for root escape early |
| Capsicum | 10 x 10 cm | 5 to 7 | Slowest of the three, keep EC low |
| Lettuce | Small plug or pellet | 2 to 3 | Fine grade, shallow root zone |
| Strawberry | 7.5 x 7.5 cm | 4 to 6 | Sensitive to sodium, check spec |
Treat those as starting points. Your climate, your season and your variety will move them.
What propagators say
A nursery manager in Ontario told us: “I used this as like this for my first grafted tomato batch, hydrating the blocks the morning I needed them, and about a fifth of the cores were still dry inside. Now we condition the day before and check a sample. Uniformity went up immediately and we did not change supplier.”
A propagator supplying growers in the Leamington cluster, where the Ontario Greenhouse Vegetable Growers represent a substantial share of North American greenhouse vegetable production, put it commercially: “Our customers are really happy with our transplant consistency, and they said like this, the whole house comes into production within the same week now.” That came from switching to mesh benching and a lower EC block, nothing more complicated.
Frequently asked questions
What EC should propagation blocks have?
Under roughly 0.5 mS/cm in a 1:1.5 volume extract, which is meaningfully tighter than production slab tolerances. Young roots have no buffer against salt stress, so a block that would be perfectly fine for a mature plant can stall a seedling.
How long should I soak coco coir starter blocks before sowing?
Long enough that the core is fully hydrated, which is usually longer than it looks from outside. Break a sample block open and check the centre before committing the batch. Conditioning the day before you need them is far safer than the morning of.
Can I use production grade coir for propagation?
You can, but results are usually uneven. Production grades are engineered for water buffering and long-term structure rather than the fast drainage and physical integrity a plug needs. The saving is small and the risk sits at the most important stage of your crop.
Do I need buffered material for propagation?
Yes, more so than in production. Unbuffered coir releases potassium that upsets the calcium balance in a very low strength propagation feed, which shows as stretched, weak plugs. Buffered blocks remove that variable entirely.
When should I transplant out of the block?
When roots have colonised the block and reached the outer surface, but before they start circling or escaping in quantity. Three to five weeks covers most greenhouse vegetables, though capsicum runs longer and cucumber runs shorter. Judge by roots rather than by the schedule.
Pulling it together
Propagation rewards attention in a way very few parts of the operation do, because errors there multiply across every plant for the rest of the season. Get the density right, keep EC low, condition properly, match the block to the hole, prune the roots with airflow, and keep the house clean.
Six things. None of them expensive.
If you want the technical background on how the raw material is processed before it becomes a moulded block, the Coconut Research Institute of Sri Lanka publishes useful work on coir properties. And when those transplants are ready to move into production, the practical conditioning and transplant steps in this grow bags guide will keep week one uneventful, which is exactly what week one should be. Producers such as Coco Labs publish block specifications alongside their slab dimensions, which makes matching the two considerably less painful than working it out by trial.